首先,我需要感慨,搞了快一个月,最终终于成功!原神,启动!
反反复复搞了很久,总是给我检测出虚拟机环境报错,最后总算原神启动了!
别想像hyperV一样直通显卡玩,Linux没有DirectX且开了就过不了安检(虚拟机检测)
闲聊
为什么虚拟机里开原神呢?
- 真~云原神!无限时间,只要有望就能玩!
- P106在linux上的完美使用方案,任意可配双显卡(2*Nvidia也可以),娱乐游戏两不误
- 我E5核多!多开虚拟机更能发挥最大用处!

打patch
QEMU由于有许多特征容易被ban,被反虚拟机引擎发现然后GG,因此 需要打补丁。
下载我改进的这个补丁:
这个patch我做了二次修改,音频输出没问题了
将QEMU全部改成其他配件,VIRTUAL全部改成有意义的文本
适用于 QEMU v8.2.8
apt install libacl1-dev libaio-dev libattr1-dev libcap-ng-dev libcurl4-gnutls-dev libepoxy-dev libfdt-dev libgbm-dev libglusterfs-dev libgnutls28-dev libiscsi-dev libjpeg-dev libnuma-dev libpci-dev libpixman-1-dev libproxmox-backup-qemu0-dev librbd-dev libsdl1.2-dev libseccomp-dev libslirp-dev libspice-protocol-dev libspice-server-dev libsystemd-dev liburing-dev libusb-1.0-0-dev libusbredirparser-dev libvirglrenderer-dev meson quilt xfslibs-dev
curl https://download.qemu.org/qemu-8.2.8.tar.xz -L | tar x --xz
cd qemu*
git apply [patch位置]
./configure --target-list=x86_64-softmmu && make -j40
记下当前的位置 pwd,接下来有用
没必要make install,防止与系统qemu冲突,更详细的原因在下面有写!
⚠️ 注意
千万不要选择 virtio 系列驱动,显卡选VGA,网卡选e1000e!
改kernel
首先,这个是原文
但是,由于 RDTSC 等基于时间的攻击(在 VM 中报告不正确),这不是灵丹妙药,尽管如此,更改虚拟设备的这些信息仍然是创建未被检测到的虚拟机不可或缺的一部分。
➜  zPatch git:(main) ✗ uname -a
Linux hiz-PC 6.9.6-amd64-desktop-rolling #1 SMP PREEMPT_DYNAMIC Mon Jan 13 18:05:03 CST 2025 x86_64 GNU/Linux
Linux 6.9.6,对应 https://www.kernel.org/pub/linux/kernel/v6.x/linux-6.9.6.tar.gz
然后patch一下。这个真的是我反复检查后改的
--- arch/x86/kvm/vmx/vmx.c    2024-06-21 20:40:40.000000000 +0800
+++ arch/x86/kvm/vmx/vmx.c    2025-01-13 17:30:11.917205349 +0800
@@ -6093,6 +6093,42 @@
        return 1;
 }

+// ADDED by iz
+static u32 print_once = 1;
+
+static int handle_rdtsc(struct kvm_vcpu *vcpu)
+{
+       static u64 rdtsc_fake = 0;
+       static u64 rdtsc_prev = 0;
+       u64 rdtsc_real = rdtsc();
+
+       if(print_once)
+       {
+               printk("[handle_rdtsc] fake rdtsc vmx function is working\n");
+               print_once = 0;
+               rdtsc_fake = rdtsc_real;
+       }
+
+       if(rdtsc_prev != 0)
+       {
+               if(rdtsc_real > rdtsc_prev)
+               {
+                       u64 diff = rdtsc_real - rdtsc_prev;
+                       u64 fake_diff =  diff / 16; // if you have 4.2Ghz on your vm, change 16 to 20
+                       rdtsc_fake += fake_diff;
+               }
+       }
+       if(rdtsc_fake > rdtsc_real)
+       {
+               rdtsc_fake = rdtsc_real;
+       }
+       rdtsc_prev = rdtsc_real;
+       vcpu->arch.regs[VCPU_REGS_RAX] = rdtsc_fake & -1u;
+       vcpu->arch.regs[VCPU_REGS_RDX] = (rdtsc_fake >> 32) & -1u;
+
+       return skip_emulated_instruction(vcpu);
+}
+
 /*
  * The exit handlers return 1 if the exit was handled fully and guest execution
  * may resume.  Otherwise they set the kvm_run parameter to indicate what needs
@@ -6151,6 +6187,7 @@
        [EXIT_REASON_ENCLS]                   = handle_encls,
        [EXIT_REASON_BUS_LOCK]                = handle_bus_lock_vmexit,
        [EXIT_REASON_NOTIFY]                  = handle_notify,
+       [EXIT_REASON_RDTSC]                   = handle_rdtsc,
 };

 static const int kvm_vmx_max_exit_handlers =
保存为a.patch,然后 patch -p0 < a.patch 打patch
最后拷贝配置并编译内核
cp /boot/config-6.9.6-amd64-desktop-rolling .config
make -j40 && sudo make INSTALL_MOD_STRIP=1 modules_install && sudo make install
重启系统,接下来uname -a,如果是新鲜出炉的日期,那么就是成功了
安装virt-manager
参考 我的旧文档,安装完libvirt后
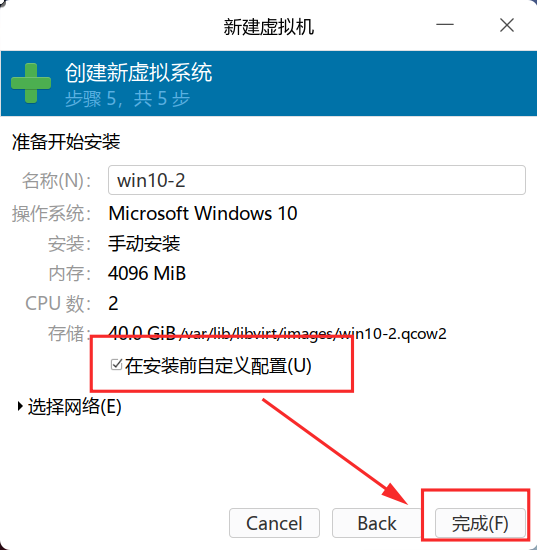
安装系统引导随便填一下就行了,最后选择“在安装前自定义配置(U)”
<domain xmlns:qemu="http://libvirt.org/schemas/domain/qemu/1.0" type="kvm">
<name>win10</name>
<uuid>83b61657-5290-4a1c-a582-102eaa179f81</uuid>
<metadata>
<libosinfo:libosinfo xmlns:libosinfo="http://libosinfo.org/xmlns/libvirt/domain/1.0">
<libosinfo:os id="http://microsoft.com/win/10"/>
</libosinfo:libosinfo>
</metadata>
<memory unit="KiB">6291456</memory>
<currentMemory unit="KiB">6291456</currentMemory>
<vcpu placement="static">4</vcpu>
<os firmware="efi">
<type arch="x86_64" machine="pc-q35-8.2">hvm</type>
<firmware>
<feature enabled="no" name="enrolled-keys"/>
<feature enabled="yes" name="secure-boot"/>
</firmware>
<loader readonly="yes" secure="yes" type="pflash">/usr/share/OVMF/OVMF_CODE_4M.secboot.fd</loader>
<nvram template="/usr/share/OVMF/OVMF_VARS_4M.fd">/var/lib/libvirt/qemu/nvram/win10_VARS.fd</nvram>
</os>
<features>
<acpi/>
<apic/>
<hyperv mode="custom">
<relaxed state="on"/>
<vapic state="on"/>
<spinlocks state="on" retries="8191"/>
</hyperv>
<vmport state="off"/>
<smm state="on"/>
</features>
<cpu mode="host-passthrough" check="none" migratable="on">
<topology sockets="1" dies="1" clusters="1" cores="4" threads="1"/>
</cpu>
<clock offset="localtime">
<timer name="rtc" tickpolicy="catchup"/>
<timer name="pit" tickpolicy="delay"/>
<timer name="hpet" present="no"/>
<timer name="hypervclock" present="yes"/>
</clock>
<on_poweroff>destroy</on_poweroff>
<on_reboot>restart</on_reboot>
<on_crash>destroy</on_crash>
<pm>
<suspend-to-mem enabled="no"/>
<suspend-to-disk enabled="no"/>
</pm>
<devices>
<emulator>【【 这里写前面要求的qemu源代码位置 】】/build/qemu-system-x86_64</emulator>
<disk type="block" device="disk">
<driver name="qemu" type="raw" cache="none" io="native" discard="unmap"/>
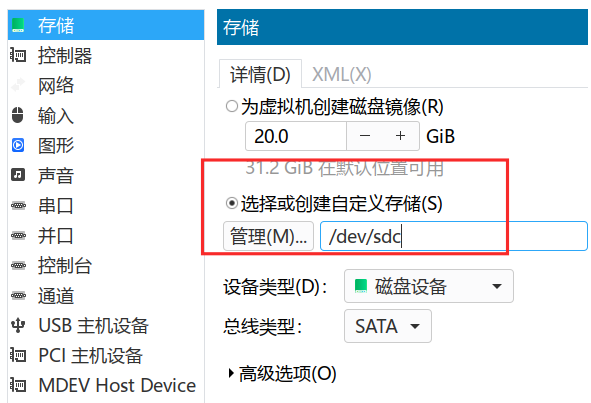
<source dev="/dev/sdc"/>
<target dev="sda" bus="sata"/>
<boot order="2"/>
<address type="drive" controller="0" bus="0" target="0" unit="0"/>
</disk>
<disk type="file" device="disk">
<driver name="qemu" type="qcow2"/>
<source file="/home/hiz/Documents/虚拟机/shared.qcow2"/>
<target dev="sdb" bus="sata"/>
<address type="drive" controller="0" bus="0" target="0" unit="1"/>
</disk>
<controller type="usb" index="0" model="qemu-xhci" ports="15">
<address type="pci" domain="0x0000" bus="0x02" slot="0x00" function="0x0"/>
</controller>
<controller type="pci" index="0" model="pcie-root"/>
<controller type="pci" index="1" model="pcie-root-port">
<model name="pcie-root-port"/>
<target chassis="1" port="0x10"/>
<address type="pci" domain="0x0000" bus="0x00" slot="0x02" function="0x0" multifunction="on"/>
</controller>
<controller type="pci" index="2" model="pcie-root-port">
<model name="pcie-root-port"/>
<target chassis="2" port="0x11"/>
<address type="pci" domain="0x0000" bus="0x00" slot="0x02" function="0x1"/>
</controller>
<controller type="pci" index="3" model="pcie-root-port">
<model name="pcie-root-port"/>
<target chassis="3" port="0x12"/>
<address type="pci" domain="0x0000" bus="0x00" slot="0x02" function="0x2"/>
</controller>
<controller type="pci" index="4" model="pcie-root-port">
<model name="pcie-root-port"/>
<target chassis="4" port="0x13"/>
<address type="pci" domain="0x0000" bus="0x00" slot="0x02" function="0x3"/>
</controller>
<controller type="pci" index="5" model="pcie-root-port">
<model name="pcie-root-port"/>
<target chassis="5" port="0x14"/>
<address type="pci" domain="0x0000" bus="0x00" slot="0x02" function="0x4"/>
</controller>
<controller type="pci" index="6" model="pcie-root-port">
<model name="pcie-root-port"/>
<target chassis="6" port="0x15"/>
<address type="pci" domain="0x0000" bus="0x00" slot="0x02" function="0x5"/>
</controller>
<controller type="pci" index="7" model="pcie-root-port">
<model name="pcie-root-port"/>
<target chassis="7" port="0x16"/>
<address type="pci" domain="0x0000" bus="0x00" slot="0x02" function="0x6"/>
</controller>
<controller type="pci" index="8" model="pcie-root-port">
<model name="pcie-root-port"/>
<target chassis="8" port="0x17"/>
<address type="pci" domain="0x0000" bus="0x00" slot="0x02" function="0x7"/>
</controller>
<controller type="pci" index="9" model="pcie-root-port">
<model name="pcie-root-port"/>
<target chassis="9" port="0x18"/>
<address type="pci" domain="0x0000" bus="0x00" slot="0x03" function="0x0" multifunction="on"/>
</controller>
<controller type="pci" index="10" model="pcie-root-port">
<model name="pcie-root-port"/>
<target chassis="10" port="0x19"/>
<address type="pci" domain="0x0000" bus="0x00" slot="0x03" function="0x1"/>
</controller>
<controller type="pci" index="11" model="pcie-root-port">
<model name="pcie-root-port"/>
<target chassis="11" port="0x1a"/>
<address type="pci" domain="0x0000" bus="0x00" slot="0x03" function="0x2"/>
</controller>
<controller type="pci" index="12" model="pcie-root-port">
<model name="pcie-root-port"/>
<target chassis="12" port="0x1b"/>
<address type="pci" domain="0x0000" bus="0x00" slot="0x03" function="0x3"/>
</controller>
<controller type="pci" index="13" model="pcie-root-port">
<model name="pcie-root-port"/>
<target chassis="13" port="0x1c"/>
<address type="pci" domain="0x0000" bus="0x00" slot="0x03" function="0x4"/>
</controller>
<controller type="pci" index="14" model="pcie-root-port">
<model name="pcie-root-port"/>
<target chassis="14" port="0x1d"/>
<address type="pci" domain="0x0000" bus="0x00" slot="0x03" function="0x5"/>
</controller>
<controller type="sata" index="0">
<address type="pci" domain="0x0000" bus="0x00" slot="0x1f" function="0x2"/>
</controller>
<interface type="network">
<mac address="52:54:00:28:37:a5"/>
<source network="default"/>
<model type="e1000e"/>
<link state="up"/>
<address type="pci" domain="0x0000" bus="0x01" slot="0x00" function="0x0"/>
</interface>
<input type="mouse" bus="ps2"/>
<input type="keyboard" bus="ps2"/>
<graphics type="spice">
<listen type="none"/>
<image compression="off"/>
<gl enable="no"/>
</graphics>
<sound model="ich9">
<address type="pci" domain="0x0000" bus="0x00" slot="0x1b" function="0x0"/>
</sound>
<audio id="1" type="spice"/>
<video>
<model type="vga" vram="16384" heads="1" primary="yes"/>
<address type="pci" domain="0x0000" bus="0x00" slot="0x01" function="0x0"/>
</video>
<hostdev mode="subsystem" type="pci" managed="yes">
<source>
<address domain="0x0000" bus="0x03" slot="0x00" function="0x0"/>
</source>
<address type="pci" domain="0x0000" bus="0x03" slot="0x00" function="0x0"/>
</hostdev>
<redirdev bus="usb" type="spicevmc">
<address type="usb" bus="0" port="1"/>
</redirdev>
<redirdev bus="usb" type="spicevmc">
<address type="usb" bus="0" port="2"/>
</redirdev>
<redirdev bus="usb" type="spicevmc">
<address type="usb" bus="0" port="3"/>
</redirdev>
<watchdog model="itco" action="reset"/>
<memballoon model="none"/>
</devices>
<qemu:commandline>
<qemu:arg value="-smbios"/>
<qemu:arg value="type=0,vendor="American Megatrends International",date="01/18/2014",version=H61M-K.0801"/>
<qemu:arg value="-smbios"/>
<qemu:arg value="type=1,manufacturer=ASUS,product=H61M-K,version=2018.1"/>
<qemu:arg value="-smbios"/>
<qemu:arg value="type=2,manufacturer=Intel,version=2012.5,product=i5-3570T"/>
<qemu:arg value="-smbios"/>
<qemu:arg value="type=3,manufacturer=XBZJ"/>
<qemu:arg value="-smbios"/>
<qemu:arg value="type=17,manufacturer=KINGSTON,loc_pfx=DDR3,speed=1600,serial=000000,part=0000"/>
<qemu:arg value="-smbios"/>
<qemu:arg value="type=4,manufacturer=Intel,max-speed=3300,current-speed=2400"/>
<qemu:arg value="-cpu"/>
<qemu:arg value="host,family=6,model=158,stepping=2,model_id=Intel(R) Core(TM) i5-3570T CPU @ 2.40GHz,rdtscp=off,vmware-cpuid-freq=false,enforce=false,host-phys-bits=true,hypervisor=off"/>
<qemu:arg value="-machine"/>
<qemu:arg value="q35,kernel_irqchip=on"/>
</qemu:commandline>
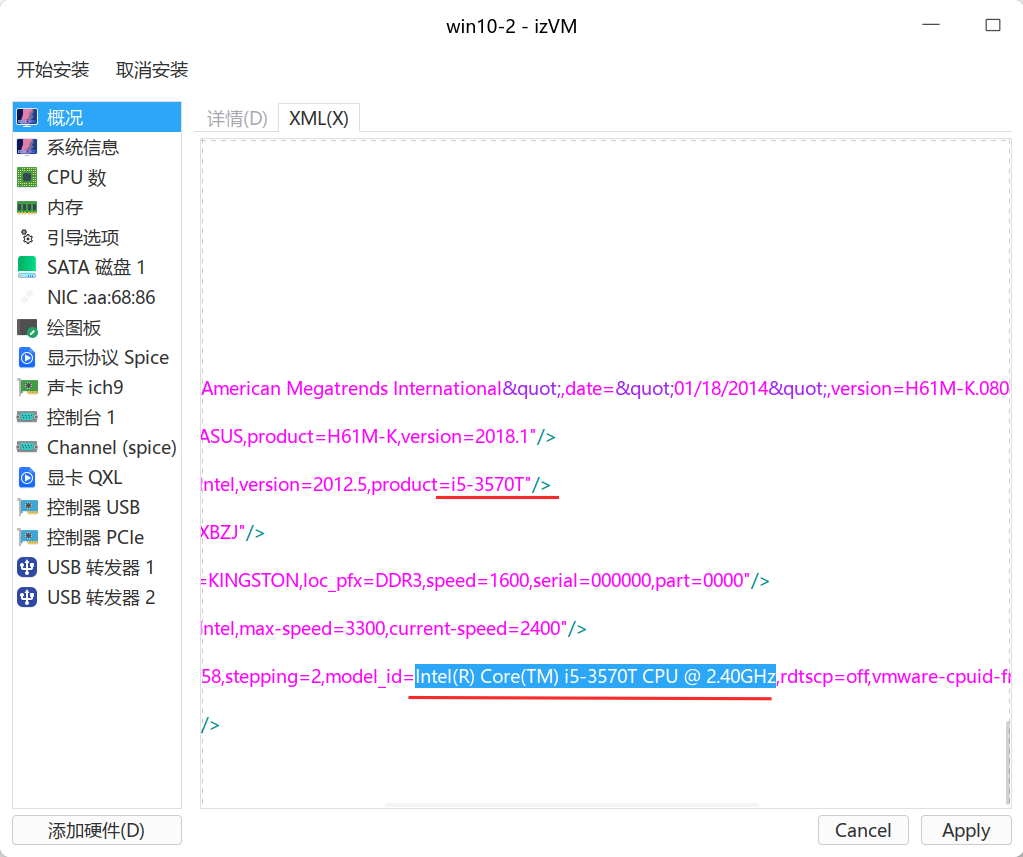
</domain>将这段内容拷贝到xml,"Apply"后点击上面的“开始安装”
如果提示没有PCI设备什么的,自己看着办,将PCI设备删除重新添加自己的显卡
附录:一些小技巧
- patch后的qemu,virtio几乎废了,打驱动后也无法识别,需要自己选择驱动程序
- virtio容易被ACE引擎发现,不要露出 小鸡脚(?)
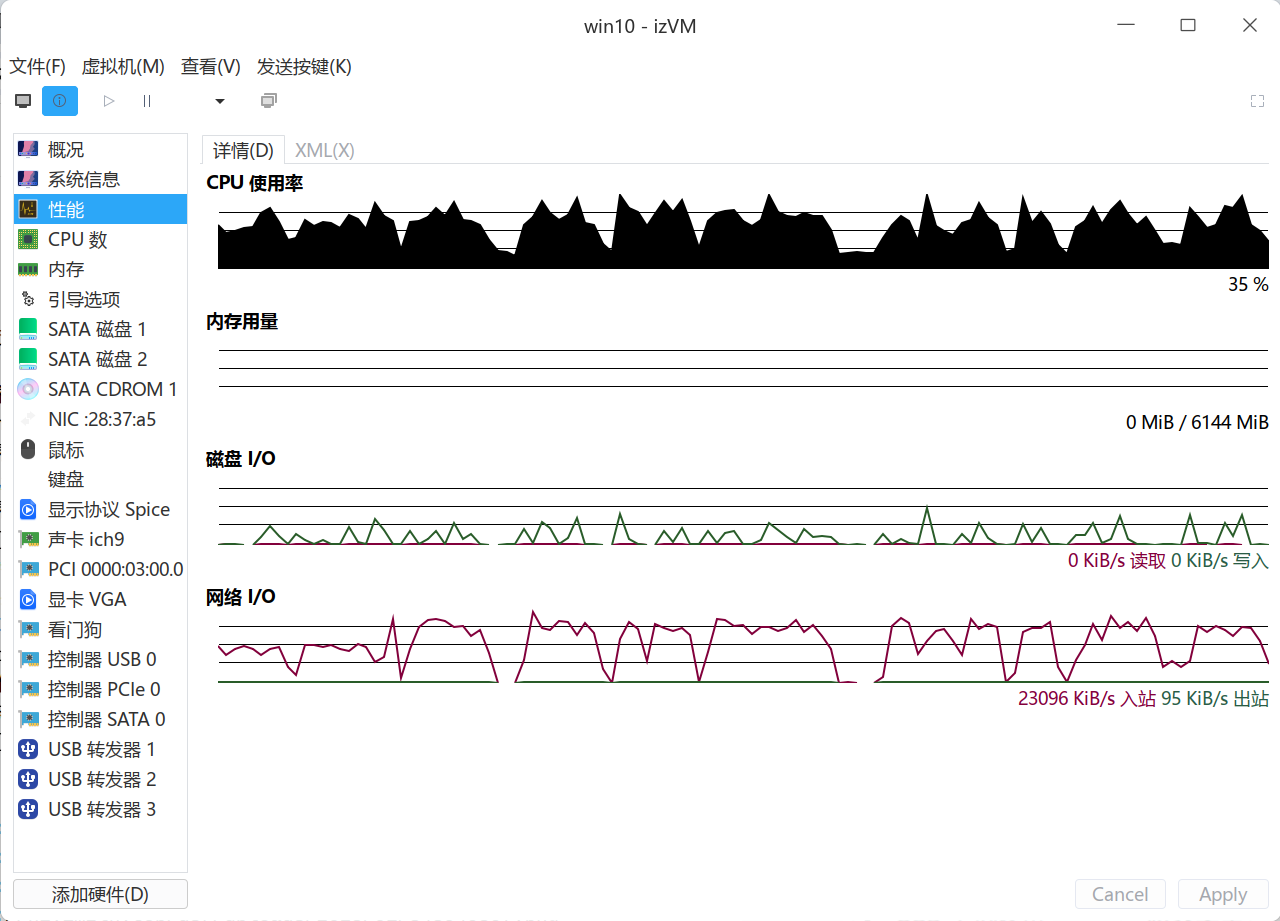
- memballoon是一个内存引擎,但是基于virtio串口的,所以我这里改XML关掉了
但是这样就看不了内存占用率了,正常
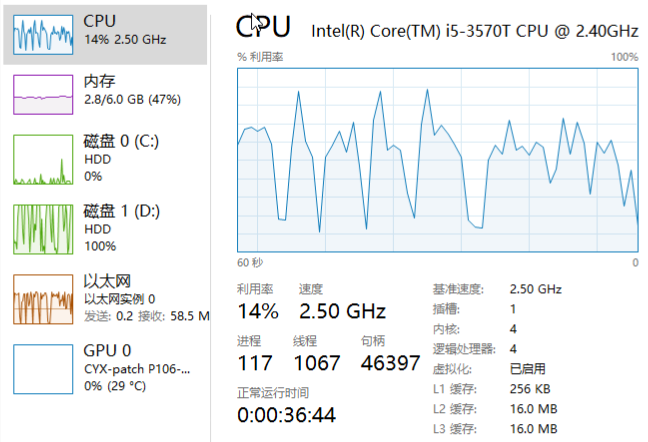
- 后面的CPU配置我选择这颗CPU的配置是因为这个CPU最符合我的实体机情况
你可以自己看着改,改成i9-14900k也没关系的
- 任何GPU驱动都可以打,P系列矿卡需要使用CXY-Patch版本的
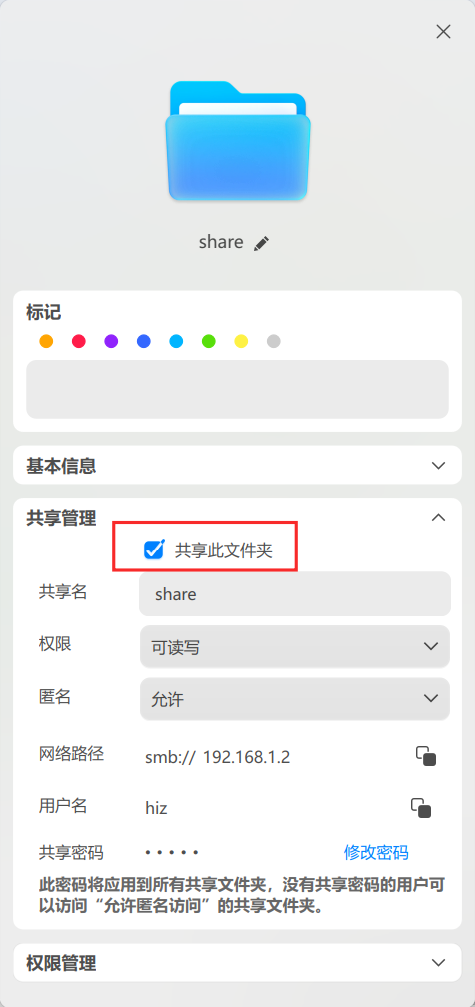
- 建议使用smb共享文件,避免使用
virtfs。我在deepin上使用很方便
- 不建议使用Win11系统,由于没有virtio显卡加速鼠标能卡出残影
实测!不要作死 - 建议使用固态硬盘加速,我使用了一块实体60G固态(linux/windows双系统可切换)
你会感兴趣的其他链接
本文由 zlh 创作,采用 知识共享署名4.0 国际许可协议进行许可。
本站文章除注明转载/出处外,均为本站原创或翻译,转载前请务必署名。